What's on the menu?
Chicken with Grapes and Couscous
Chocolate Cake with Peanut Butter Filling and Chocolate Ganache
Today is my boss’s birthday and being that it’s the month of St. Patrick’s Day, I figured it fitting to have a “green” type of dessert.
I remembered times visiting my grandma around Christmas and the delicious brownies she’d make with a green mint layer. I thought these would be perfect. Sure enough…the boss devoured three within 5 minutes! I’m keeping how many calories he consumed to myself, though. Wouldn’t want to spoil his birthday.
CHOCOLATE MINT BROWNIES
Makes: 5-6 dozen (I have no clue how because I only got 28)
FILLING:
2 c powdered sugar
1 stick butter, softened
1 T water
½ t mint (or peppermint) extract
3 drops green food coloring
TOPPING:
1 package (10 oz) mint chocolate chips (see “Notes”)
1 stick butter
Combine the first 7 ingredients in a large mixing bowl. Beat at medium speed for 3 minutes. Pour batter into a greased 13 x 9 pan. Bake at 350 for 30 minutes (top of brownies will still appear wet).
Combine filling ingredients in a medium mixing bowl: beat until creamy. Spread over cooled brownies. Refrigerate until set.
For topping, melt chocolate chips and butter over low heat in a small saucepan. Let cool for 30 minutes or until lukewarm, stirring occasionally. Spread over filling. Chill thoroughly before cutting. Store in the refrigerator.
NOTES: If you can’t find mint chocolate chips, simply add ½ t mint or peppermint extract to the plain chocolate chips. The topping called for 9 T of butter, but I only used 8. Also, I used “Promise” butter sticks and based the below calorie number on that.
According to my grandma, these get more moist by the day and they’re the greatest brownie you’ll ever eat. I haven’t had one yet today…I’m waiting until I get home with hubby…but I liked the spatula after making each layer last night and it sure was yummy!
CALORIES: When cut into 28 pieces, each serving contains about 255 calories.

Happy Birthday, Caleb! How is it even possible that you are one already?! I only got a chance to meet you when you were 3 months old. This living on different coasts really stinks, but I do cherish all the times I get to hear your sweet sounds on the phone. Please come visit your Aunt Brie before you get too much older.
I loved this picture we used on your birth announcement. You are such a happy-go-lucky little guy. Your big brother, Braden, wasn’t too sure about you at first, but you guys have grown to be best buds. And, Grandma, well, you know she loves you.
I think I startled you the first time I met you!
I know that sometimes it seems like we give Braden all the attention, but I promise you buddy that next time I see you we’re going to have some special “Aunt Bee” and “Kayo” time.
Hope you have a fabulous birthday and enjoy the duck hooded towel and wash cloth puppet I made you for your gift. I hear bath time is your absolute favorite activity and that you go crazy for the color yellow.
I love you, Caleb!
Hubby & I hadn’t had a photo taken of us for awhile so I figured the perfect time would be last Thursday when we went out on the town.
Unfortunately, when I downloaded the photo it was not so great.
The color was washed out. You can see all the junk from two families sharing one living room, my face is a weird orange color, and don’t even get me started on how I’m standing.
Enter my photo editing program. I prefer to use this one from work, but this works just as great too for free.
A crop here (to remove the junk), some cloning there (to get rid of the humidifier), some red eye removal, some airbrushing (to attempt to correct my funky orange skin) and a little brightening and contrast and this is what you end up with:
Still not the best photo we’ve ever taken, but much better than it started out. I still have to fix the orange skin issue. Must be I need to get a different foundation for winter. Weird how it looks fine in the mirror, but in photos I look like I’m addicted to spray on tans even though I’ve never had one in my life. Promise.
Before:
I have some sad news to announce. I’m no longer going to be selling jewelry unless I have a specific request for something. It was too expensive to be able to afford quality materials for the few number of pieces I was selling. I just don’t have the time to devote to it right now so I’m in the process of using up the things I like and trying to sell off the rest of my supplies. I’m eventually going to be switching my focus back to my first crafting love which is making cards and graphic design and my new love of sewing (which is much more budget friendly than quality jewelry). Hopefully once things calm down on the home front and at work I’ll be able to find time to devote to Divine Creations and make it a success.
For now, though, here’s the latest thing I made:
I am in LOVE with these earrings. They hang so beautifully and look so feminine. They have sterling silver ear wires, ivory Czech glass pearls and silver-plated dangles held together with silver-plated jump rings. It was so fun to actually see what I had pictured in my head turn out in real life.
I do have supplies to make two more pairs, so if you would like one, leave me a comment with a way to contact you or e-mail me at divinecreations4u (at) gmail (dot) com. They are $15 each (they’re a little time consuming to make) including shipping within the lower 48 states. These go just as great with jeans as they do with a little black dress.
Stay tuned for a few more pieces I’ll be posting here at discount as well in the near future.
We had two birthdays at work this week. Last year I brought in one cake for both guys. This year I brought in something smaller on each of their separate days.
This year I’m not always doing cake, but whatever dessert floats my boat at the time. Due to a serious lack of sleep Saturday night, I made it easy on myself Sunday and made Blondie Bars for the Monday birthday.
For the other birthday I made a new cookie recipe my mom sent me in 2008. It actually came from my brother’s friend’s mom when my brother was making cookies for his girlfriend. Follow that? My mom thought it was just so cute how Brock & his friend where exchanging recipes.
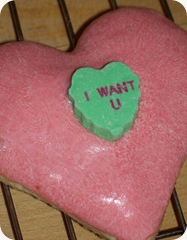
Growing up, every Valentine’s Day we’d make the same heart-shaped cookies with pink frosting and a conversation heart on top and then drive around to deliver them to all our friends. Supposedly this new recipe is a better version of that one.
I waited to make them until now because I’m a tightwad and didn’t want to spend $3 on a bag of conversation hearts so I waited until they went on sale after the holiday hubby also wanted to bring some to deliver to the lady’s who work in the Mayor’s office at town hall and the meeting around Valentine’s Day was cancelled due to a snowstorm and the next one was last night. I’m all about killing two birds with one stone.
So, yes, the birthday boy at work was a little embarrassed today when I showed up with cookies that said “heart throb” and “sugar lips” and “I want you”, but I think he quickly got over it when he tasted how delicious they were.
I know it’s a little late for this year, but here’s the recipe for next year:
VALENTINE’S DAY COOKIES
1/2 c. shortening
1 c. sugar
2 well beaten eggs
2 T. light cream
1 T. vanilla
3 1/2 c. cake flour
2 teaspoons baking powder
Stir together flour and baking powder. In separate bowl cream together shortening, eggs, sugar, cream and vanilla. Add sifted ingredients to creamed mixture. Shape into ball, wrap in saran wrap and chill overnight.
Dust board or counter top with enough powder sugar to keep dough from sticking. Roll out until dough is about 1/2 inch thick. Dip cookie cutter in powder sugar before cutting each cookie (to keep from sticking). Place cookies on lightly greased cookie sheet.
Bake at 375 degrees for 8 minutes or until slightly golden brown on the outside. Cool completely before icing.
For Icing combine the following:
1 lb. powder sugar
1/4 lb. butter (1 stick), softened
1/8 t. salt
1 t. vanilla
3-4 T. milk (mixing in one tablespoon at a time until desired consistency)
food coloring (optional)
NOTE: I should have stopped after 3 T of milk, but silly me kept going. I think that’s why my frosting has the white swirls in it. I found the best way to ice the cookies was to hold them by the side and dip them in the frosting. Then kind of shake them to get it to settle down smoothly and put the sprinkles or conversation hearts on right way. Let sit out on the counter a few hours until the frosting hardens and then store covered.
When my brother & his girlfriend were visiting, hubby made us a delicious treat of one of his favorite desserts of all times – bananas foster. (Obviously this was before we started our FBD experiment!)
The handsome chef playing with fire after adding all the rum to his bananas.
He used some puff pastry dough that I had in the freezer and cut it into rectangles before baking. When they were done, we split them in half, placed a scoop of vanilla ice cream on top and then topped with the delicious bananas foster. It was heaven on a plate.
The only thing hubby said he’d do differently next time would be to add a little less rum because it was a little strong tasting.
BANANAS FOSTER
from Southern Living
1/4 cup butter
1/3 cup firmly packed dark brown sugar
1/2 tsp ground cinnamon
4 bananas, quartered
1/3 cup banana liqueur (if you don’t have, recipe says to double the rum)
1/3 cup dark rum
1 pint vanilla ice cream
Melt butter in a large skillet over medium-high heat; add brown sugar and next 3 ingredients. Cook, stirring constantly, about 2 minutes or until bananas are tender. Remove from heat. Pour rum into a small long-handled saucepan; heat just until warm. Remove from heat. Ignite with a long match and pour over bananas. Baste bananas with sauce until flames die down. Server over ice cream. Serves: 4
NOTE: We didn’t have banana liqueur and so we had to double the rum. I think next time I’ll make sure to get the banana liqueur.