Esther 4:14b

"...and who knows whether you have not attained royalty for such a time as this."


Showing posts with label DIY day. Show all posts

Tuesday, October 26, 2010

Tutorial Tuesday: Box Pleat Crib Skirt

I’m slowly making progress on the crib bedding and last week I finished up the crib skirt. I’m so happy with how it turned out.

100_5751

It is 18” long which is the perfect length because it hides the drawers under the crib when the mattress is at the top setting and it will just brush the floor when I drop the mattress down to the middle setting. I guess I’ll just have to go without when/if we drop the mattress down to the very bottom setting.

(Side note: HUGE thank you to some great friends from church who gave us their old crib. Ideally, I would have taken the time to paint it white, but at this stage in the game, it works just fine how it is.)

As you see in the picture, the crib sheets are pink (2 light and 2 dark) and the bumper will be out of the green fabric with the striped fabric as binding and ties. My mother-in-law made the binding for me quickly this past weekend and I’m hoping to get the bumper complete this week, but we’ll see.

I made up my own steps for sewing the box pleat skirt as I went along, so I’m sure there is a faster/more proper way to do it, but here are the steps I took to make an 18” skirt with two different fabrics and a box pleat (NOTE: I only had the skirt hang on the front and sides of the crib since the back is against the wall. If you want a 4-sided skirt, repeat the steps/materials for the front.)

MATERIALS

For under mattress:
1 - White sheet cut to the (length + 1”) x (width + 1”) of your crib

For front of skirt (double if you’re making a 4-sided skirt):
1 - Main fabric (green paisley in my case) cut to 15” wide x (length + 8”) of your crib
1 - Accent fabric (stripe in my case) cut to 5” wide x (length + 8”) of your crib

For sides of skirt:
2 - Main fabric cut to 15” wide x (length + 1”) of side of crib
2 - Accent fabric cut to 5” wide x (length + 1”) of side of crib


100_5735
For the front and side panels, place the top of the accent piece against the bottom of the main piece right sides together and sew using a 1/2” seam allowance.

100_5736
Fold the bottom of your accent piece up a 1/2” and pin. I did this step second so I could ensure that my accent strip was exactly 4” wide because I’m not the best when it comes to cutting my fabric straight, but you could do it before you attach your accent piece to your main piece if you prefer.

100_5737
Sew hem using a 1/4” seam allowance.

100_5739
Trim excess fabric along the hem you just stitched.

100_5740
Press seam between the main piece and accent piece open and then press it back over and sew 1/8” from your original stitch line to create a top stitch on your main fabric. (I did this for the sides, but didn’t do it for the front – it’s optional).

100_5742 
Trim the excess fabric from the seam.

100_5743
To create the box pleat (only on the front panel), I laid my fabric right side up. Find the middle of the panel and place a pin there. Fold one side of the fabric over the middle pin (right sides together) so that you have 1.75” to the side of the middle pin. Refold the fabric back on itself (wrong sides together, but right side again facing up) and pin. Repeat on the other side. Each fold on the side of the middle pin should be 1.75” long from the middle pin to the edge of the fold, giving you a total pleat of 3.5” from the edge of the fold on one side of the middle pin to the edge of the fold on the other. Here’s a closer look at the pinned pleat.

100_5744

100_5745
Using a 1/4” seam allowance, run a quick stitch across the top of your pleat so you can remove the pins.

100_5746
Hem the sides of all three panels (2 sides and front) by folding the fabric up 1/2” and sew using a 1/4” seam allowance. Trim excess fabric.

 100_5748 
With right sides together, pin the top of the front of your skirt to one of the long sides of the white sheet. Sew using 1/2” seam allowance.

100_5747

Repeat for the 2 sides.

You’re all done! Place it on the crib under the mattress and step back to admire your work. Well, maybe iron it again first unlike I did and then step back to admire your work.

100_5750
You’ll notice the crepe paper flower wreath peeking out the top of the crib. Sorry I haven’t shown you yet what I’ve done with it like I said I would last week, but this very pregnant momma is running a little behind.

The best part about the crib bedding is that I get a custom look for a very affordable price. For all three fabrics (the green paisley, pink stripe and green lattice print) I paid less than $50 and I have enough to make the skirt, bumper and valances for the windows.

The downside of my crib skirt making experience?

100_5749
I completely forgot to account for the fact that due to the drawers underneath the crib, the side of the skirt is not able to hang down so half of my fabric is just bunched up on top of the drawer. Haven’t decided yet if I’m going to take the drawer out and forgo it or if I’m going to hem my sides up shorter…I hate cutting off perfectly good fabric :(

Linkin’ up to Tutorial Tuesday at Hope Studios. Hop on over to check out more awesome projects.

Tuesday, October 19, 2010

DIY: Framed Nursery Art

This nursery remodel is being done on a very tight budget. Thus, I’m having to think outside the box for some ways to make a big impact with small funds.

I was shopping the local dollar store the other day and came across 4x6 unfinished wood frames that were 2/$1. I snatched two packs of those puppies up and headed home to work on them.

A few coats of white craft paint with some pink and green dots around the edges made them coordinate beautifully with the nursery colors.

I used some scrapbook paper I already had on hand as mats behind the three ultrasound photos we have of our little one at different stages throughout the pregnancy. (Ignore my poorly centered taping of the photos.)

The frames still needed something more, so I hung them with ribbon I found at the craft store (7 yards/$2.50 on 50% off sale) by hot gluing the two ribbon ends to the back of the frame. To hang the ribbon on the wall, I used some green ribbon that came on a shower gift I received to make tiny bows which I hot glued to some thumb tacks and then poked through the pink ribbon into the wall.

The final touch for this area was to use a vinyl decal I picked up a year ago for $5 at Kohl’s when it was on 80% off clearance. Score!

Here is the finished result:

Framed Nursery Art

Here is the total cost for the project:

4 x 6 wood frames: $1.50
White, pink & green paint: Free
Scrapbook Paper: Free
Photos: Free
Pink ribbon: $0.50
Green ribbon: Free
Thumb Tacks & Hot Glue: Free
Vinyl Saying: $6 (but I kinda consider it free since I bought it over a year ago)

TOTAL: $8.00

The best part is I can easily change out the pictures as our little girl grows.

I’m linking this post up to Tutorial Tuesday.

Tuesday, March 23, 2010

Spring Mantlescape

Spring has finally sprung here in the Northeast and I couldn't be happier!

This past weekend was gorgeous and I took full advantage of the opportunity to spend time outside collecting loose moss, moss-covered rocks, leafing branches and brown "pokey balls" as I like to call them (if anyone knows what they really are, please let me know).

Back at the house I arranged them with some other things I already had to bring a touch of spring to the mantle.

My sister sent me this white cabinet for Christmas and I LOVE it!

This cute little bunny and the wire dress form I picked up a year or two ago at the Christmas Tree Shops. No money in the budget this year for decor items, so it was fun shopping the house and the abundant natural decorating supplies God so richly blessed us with outside. Hopefully the moss will stay fresh for awhile, if not, there's plenty more where it came from!

Happy Spring!

I'm linking this up to Kimba's DIY day. Hop over here to check out more projects.

Tuesday, March 2, 2010

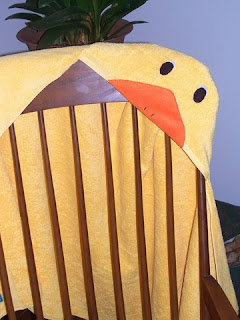
DIY Day: Duck Hooded Towel & Washcloth Puppet

Click here to see more projects

The birthday boy opened his gift the other day and loved it! Based on how small he is, I think he'll get many years of use out of this hooded towel.


To make the hooded towel, I used a tutorial I found on Infarrantly Creative. I actually came across it while doing a google search and thought it was the best tutorial of the search results. I chose a yellow towel because the birthday boy LOVES yellow and he LOVES bathtime, so I decided to turn it into a duck hooded towel by sewing on an orange fleece beak and some white and black fleece to make eyes. I think it turned out very cute.

To give him even more fun in the bath, I made a duck washcloth puppet to accompany it. I followed some instructions I found here doing another google search.


These were so easy to make, even for a novice sewer (what's the proper word...I don't want to call myself a name of where waste goes) like me. Can't wait to find new sewing projects to expand my skills.

Saturday, February 6, 2010

It’s Grown On Me

I was going to post the other day that the sign I made last weekend has grown on me finally. I actually really like it now and am proud of the affordable art I made for our family to enjoy.

Well, imagine my surprise yesterday when I was checking out Kimba's blog and saw that I was the winner of the $40 store credit to The Rusted Chain! How exciting!! I really like these items:

Create Dream Inspire Necklace

Create Dream Inspire - $23.00


Loved by Necklace

Loved By - $29.00

ANNA earrings ANNA earrings - $15.00


All I Need Necklace
All I Need - $23.00

We’re getting whalloped with snow this weekend and I have an incredibly cute nephew who turns one in a few weeks so I plan to craft his birthday gifts this weekend and will post photos soon.

Monday, February 1, 2010

Valentine’s Decor

Our mantle has been bare ever since I took the Christmas stuff down the beginning of January. I was waiting for inspiration to strike and strike it did this weekend.

Not having a lot of money, I came up with the idea to use wedding photos from my hubby’s side of the family – us, his parents, his siblings and his grandparents – as well as a custom art piece and candles. I wanted some sort of red item to make things “pop” so I was so excited when I found these red berry plants on Christmas clearance for 90% off! I paid a whopping .40 cents for each of them! A coat of white paint on their pots was all the needed to blend in with my idea.

100_5199 100_5203

You can see the beginning stages of the art I made behind the freshly painted pot.

100_5206
I wanted to make a piece that I could use at times of the year besides Valentine’s Day. The quote I decided to use is by Oliver Wendell Holmes, “Where we love is home, home that our feet may leave but not our hearts.” I thought it was perfect to accompany family photos.

First I made a file in Publisher that was the size of my board and arranged the fonts just how I wanted them. Then I printed it out and taped the pages together and taped them on my board.

100_5207 
Next I traced over each of the letters while pushing hard to transfer their outlines to the wood. Then I filled in each letter with the corresponding paint. In hindsight, I should have left it at this stage:

100_5210
Unfortunately, I decided to try and antique it a little. First, I used my sanding block on the edges and gently across the face of it. I loved this and wish I had a photo at that stage. But, I took it a step further and used some Ralph Lauren glaze I picked up at Home Depot hoping to antique the white letters even more. The result?

100_5218 
I HATE it! The glaze went on so blotchy and no matter what I tried it just made it worse. Now I’m tempted to make my own glaze by watering down some black paint and hoping it will darken it up a little bit again. Any advice?

Which version do you like better:

100_5214
Before “antiquing”

or

100_5223

After “antiquing”?

One thing I do know…I will be making art like this again because it is great impact for very little money. The final cost for this 18” x 21.5” art and mantle makeover?

Wood: Free from work scraps
Frames & Photos: Free from shopping the house
Berries & Vases: $1.20 for three
Jar Lantern Tea light holders: $3.38 for two
Paint & Brush: $3 because I was out of black and wanted a larger foam brush

TOTAL: $7.58

(Note: I also paid $15 for the stupid glaze that I didn’t consider in this cost because I used a gift card hoping I’d be able to use it on many house projects to come. After this, I’m not so sure it was a good buy.)

I’m linking this up to Thrifty Decor Chick’s Before & After Party today and to Kimba’s DIY Day on Tuesday.

Tuesday, January 12, 2010

Special Agent Oso Invitation

My youngest nephew turns one the end of February and I was commissioned to design his party invite.

Supposedly, he’s a HUGE fan of Special Agent Oso. I had never heard of this show before, but a quick little internet search provided some needed details such as color scheme, characters and special phrases the show uses.

I guess Special Agent Oso is a type of James Bond show for kids that teaches them how to do things in “3 Special Steps” because after all, “It’s all part of the plan!”

Here is the invite I designed for my nephew (click on the picture for a larger view):

Invite_no info

Hopefully he has fun at his party. Wish I could be there to join him.

I’m linking this project up to Kimba’s DIY day. Click here for more projects and don’t forget to enter one of your own for a chance to win a gift certificate from here.

Tuesday, December 22, 2009

Christmas Gift Idea – Sewing Projects

Here are the last two homemade gifts I made this year. I just recently relearned how to sew and am trying to broaden my sewing skills. I made a half retro apron for my sister and a fun sock monkey for my nephew. They opened them a week ago when they celebrated Christmas with our parents and both gifts were quite a hit!

For the apron, I followed a pattern from a book I picked up at the library called A is for Apron. There are lots of cute patterns in the book, but it didn’t get great reviews because the instructions are kind of haphazard and the patterns aren’t always correct.

My sister likes retro things so I thought this half apron would be cute. I picked up the fabric at Wal-Mart for less than $4 total, so it was a very reasonable project. My mother-in-law (who used to sew wedding dresses for a living) showed me how to use interfacing to make the waistband stiffer and how to line it to give it a more finished look because the book ignored both of these things. I think for my first piece of “clothing” it came out pretty good! And, it only took me a couple of hours.

Retro Half Apron

I had ironed it, but then it got folded up in my luggage and I pulled it out quick to model it, so please ignore the wrinkles in these photos. Also, the waist band is made to be tied in the back, but it could also tie in the front like I show it here.

Retro Half Apron Lining
The other project I made was a sock monkey for my nephew. I found the tube socks at Target for $3.50 and had all the batting. This took longer to make than the apron because the ears, mouth, arms and tail were all sewed on by hand extra well to make sure no little toddler hands could yank them off easily. I posted more about this here. This is what the monkey looked like when I was finished:

sock monkey

Here is the cutie opening the gift and checking out his new friend.

Braden with Sock Monkey_2

Here he is in his little chair carrying on a conversation with him.

Braden with Sock Monkey

Looks like the sock monkey was quite the hit!

I’m linking up to Kimba’s DIY day with this post. Hop on over to check out more projects.

Tuesday, October 20, 2009

DIY Day - Sock Monkey


Today is DIY day over at A Soft Place to Land. This week I'm linking up with one of my newest creations.

I just recently learned how to use my mother-in-law's sewing machine. If you've been here for any length of time, you know that I've wanted to learn how to use it for a long time but that it always freaked me out because it's one of those high speed commercial ones. This thing zips along with little room for error - unless you want to do a lot of seam ripping that is!

I finally learned how to use it because I've been assigned the job of sewing the velcro on the patches we have to make to stick on cows rears for one of the companies we run. Don't ask. It's part of life on a farm and all the different things associated with animal breeding.

Anyway, I decided to try my hand at making my oldest nephew a sock monkey for Christmas. Funds are a little tight this year so I'm trying to make as many things as possible. This project was CHEAP! All it cost me was the $3.24 for the pair of socks I found at Target. I already had the stuffing and buttons and thread. I orginally got the idea for the sock monkey from Monica at The Homespun Heart. She made them for her kids last Christmas. If you click over here, you'll find the link to the pattern/instructions we used.

So, what do you think? I'm pretty happy with the way he turned out and I think Braden will absolutely love him when he opens him on Christmas morning.